Install and run your first noSQL MongoDB on Mac OSX
Classified as a NoSQL database, MongoDB is an open source, document-oriented database designed with both scalability and developer agility in mind. Instead of storing your data in tables and rows as you would with a relational database, in MongoDB you store JSON-like documents with dynamic schemas; This makes the integration of data in certain types of application easier and faster.
Why?
MongoDB can help you make a difference to the business. Tens of thousands of organizations, from startups to the largest companies and government agencies, choose MongoDB because it lets them build applications that weren’t possible before. With MongoDB, these organizations move faster than they could with relational databases at one tenth of the cost. With MongoDB, you can do things you could never do before.
- Install Homebrew
$ /usr/bin/ruby -e “$(curl -fsSL https://raw.githubusercontent.com/Homebrew/install/master/install)”
Homebrew installs the stuff you need that Apple didn’t.
$ brew install wget - Install MongoDB
$ brew install mongodb - Run MongoDB
Create the data directory: $ mkdir -p /data/db
Set permissions for the data directory:$ chown -R you:yourgroup /data/db then chmod -R 775 /data/db
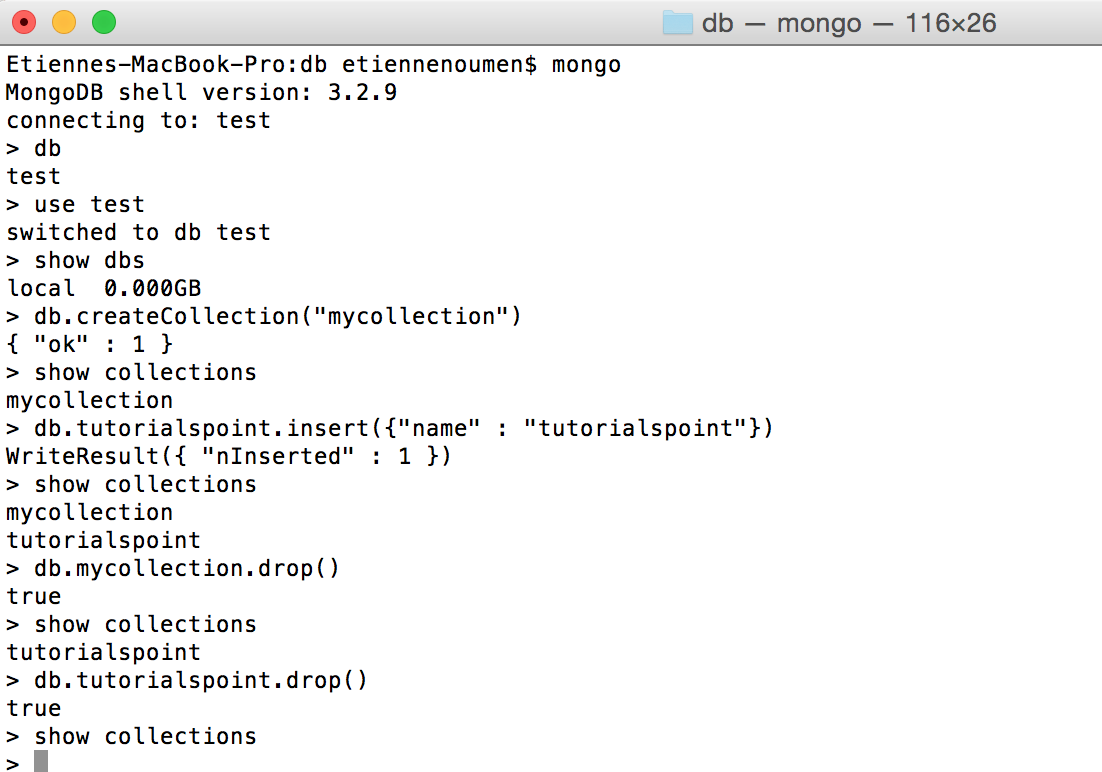
Run MongoDB (as non root): $ mongod - Begin using MongoDB.(MongoDB will be running as soon as you ran mongod above)Open another terminal and run: mongo
- Install Homebrew
References: https://docs.mongodb.com/manual/tutorial/install-mongodb-on-os-x/
Mac OS X Boot Process

What is Mac OS X Boot Process:
The Mac OS X boot process involves several stages, in which the operating system performs various tasks to prepare the system for use.
- When the Mac is powered on, the firmware (a low-level software that controls the hardware) performs a power-on self-test (POST) to check the hardware components.
- The firmware loads the bootloader, which is responsible for loading the operating system kernel and transferring control to it. In Mac OS X, the bootloader is called the boot.efi file.
- The operating system kernel, which is the core of the operating system, initializes the system and starts the system services.
- The system services, such as the device drivers, are loaded and initialized.
- The operating system loads the user profile and starts the user interface, such as the desktop or the login screen.
- The user can log in and start using the system.
This is a general overview of the Mac OS X boot process. The exact sequence of events may vary depending on the specific version of Mac OS X and the hardware configuration of the system.
| Boot ROM | Firmware. Part of Hardware system BootROM firmware is activated |
| POST | Power-On Self Test initializes some hardware interfaces and verifies that sufficient memory is available and in a good state. |
| EFI | Extensible Firmware Interface EFI does basic hardware initialization and selects which operating system to use. |
| BOOTX | boot.efi boot loader load the kernel environment |
| Rooting/Kernel | The init routine of the kernel is executed boot loader starts the kernel’s initialization procedure Various Mach/BSD data structures are initialized by the kernel. The I/O Kit is initialized. The kernel starts /sbin/mach_init |
| Run Level | mach_init starts /sbin/init init determines the runlevel, and runs /etc/rc.boot, which sets up the machine enough to run single-user. rc.boot figures out the type of boot (Multi-User, Safe, CD-ROM, Network etc.) |
- Power is turned on.
- Open Firmware code is executed.
- Hardware information is collected and hardware is initialized.
- Something (usually the OS, but also things like the Apple Hardware Test, etc.) is selected to boot. The user may be prompted to select what to boot.
- Control passes to /System/Library/CoreServices/BootX, the boot loader. BootX loads the kernel and also draws the OS badges, if any.
- BootX tries to load a previously cached list of device drivers (created/updated by /usr/sbin/kextcache). Such a cache is of the type mkext and contains the info dictionaries and binary files for multiple kernel extensions. Note that if the mkext cache is corrupt or missing, BootX would look in /System/Library/Extensions for extensions that are needed in the current scenario (as determined by the value of the OSBundleRequired property in the Info.plist file of the extension’s bundle.
- The init routine of the kernel is executed. The root device of the booting system is determined. At this point, Open Firmware is not accessible any more.
- Various Mach/BSD data structures are initialized by the kernel.
- The I/O Kit is initialized.
- The kernel starts /sbin/mach_init, the Mach service naming (bootstrap) daemon. mach_init maintains mappings between service names and the Mach ports that provide access to those services.
From here on, the startup becomes user-level:
- mach_init starts /sbin/init, the traditional BSD init process. init determines the runlevel, and runs /etc/rc.boot, which sets up the machine enough to run single-user.
- rc.boot figures out the type of boot (Multi-User, Safe, CD-ROM, Network etc.). In case of a network boot (the sysctl variable kern.netboot will be set to 1 in which case), it runs /etc/rc.netboot with a start argument.
Source: http://osxbook.com/book/bonus/ancient/whatismacosx/arch_startup.html
Monitor Macbook
How to Monitor Macbook with one single command?
$sudo sysdiagnose -f ~/Desktop/
The result is a compressed file named sysdiagnose_YYYY.MM.DD_HH-MM-SS-TTTT.tar.gz and it contains the following:
Accessibility
BluetoothTraceFile.pklg
DiagnosticMessages
Etienne’s SystemConfiguration
airport_info.txt
apsd-status.txt
bc_stats.txt
bootstamps.txt
brctl.tar.gz
breadcrumbs.txt
crashes_and_spins
darwinup.txt
dig-results.txt
disks.txt
diskutil.txt
error_log.txt
filecoordination_dump.txt
footprint-all.txt
fs_usage.txt
fsck_hfs_user.log
fsck_hfs_var.log
gpt.txt
ifconfig.txt
ioreg
ipconfig.txt
kextstat.txt
launchctl-list.txt
locale.txt
logs
lsappinfo.txt
lsmp.txt
lsof.txt
lsregister.txt
microstackshots
microstackshots_lastday.txt
microstackshots_lasthour.txt
microstackshots_lastminute.txt
mount.txt
netstat
nfsstat.txt
odutil.txt
pluginkit.txt
pmset_everything.txt
powermetrics.txt
ps.txt
ps_thread.txt
reachability-info.txt
resolv.conf
scutil.txt
smcDiagnose.txt
spindump.txt
stackshot-last-sym.log
sysctl.txt
sysdiagnose.log
system_profiler.spx
talagent.txt
taskinfo.txt
thermal.txt
top.txt
var_run_resolv.conf
vm_stat.txt
zprint.txt
You can use the top command to monitor the resources of your Macbook in real-time. The top command is a built-in utility that shows the processes that are currently running on the system, along with information about their CPU and memory usage.
To use the top command, open a terminal window and type top. The output will show the list of processes, sorted by their CPU usage, with the most CPU-intensive processes at the top. You can use the q key to exit the top command.
Here are some of the key options you can use with the top command:
-o: sort the processes by a particular resource, such as CPU usage or memory usage. For example,top -o cpuwill sort the processes by CPU usage.-s: specify the delay between updates. For example,top -s 2will update the display every 2 seconds.-u: show the process for a particular user. For example,top -u usernamewill show the processes for the user with the specified username.
You can use these options in combination to customize the output of the top command. For example, to monitor the CPU usage of the processes owned by a particular user, you can use the following command:
top -o cpu -s 2 -u username

Active Hydrating Toner, Anti-Aging Replenishing Advanced Face Moisturizer, with Vitamins A, C, E & Natural Botanicals to Promote Skin Balance & Collagen Production, 6.7 Fl Oz


Age Defying 0.3% Retinol Serum, Anti-Aging Dark Spot Remover for Face, Fine Lines & Wrinkle Pore Minimizer, with Vitamin E & Natural Botanicals

Firming Moisturizer, Advanced Hydrating Facial Replenishing Cream, with Hyaluronic Acid, Resveratrol & Natural Botanicals to Restore Skin's Strength, Radiance, and Resilience, 1.75 Oz

Skin Stem Cell Serum

Smartphone 101 - Pick a smartphone for me - android or iOS - Apple iPhone or Samsung Galaxy or Huawei or Xaomi or Google Pixel
Can AI Really Predict Lottery Results? We Asked an Expert.


Djamgatech

Read Photos and PDFs Aloud for me iOS
Read Photos and PDFs Aloud for me android
Read Photos and PDFs Aloud For me Windows 10/11
Read Photos and PDFs Aloud For Amazon
Get 20% off Google Workspace (Google Meet) Business Plan (AMERICAS): M9HNXHX3WC9H7YE (Email us for more)
Get 20% off Google Google Workspace (Google Meet) Standard Plan with the following codes: 96DRHDRA9J7GTN6(Email us for more)


FREE 10000+ Quiz Trivia and and Brain Teasers for All Topics including Cloud Computing, General Knowledge, History, Television, Music, Art, Science, Movies, Films, US History, Soccer Football, World Cup, Data Science, Machine Learning, Geography, etc....

List of Freely available programming books - What is the single most influential book every Programmers should read
- Bjarne Stroustrup - The C++ Programming Language
- Brian W. Kernighan, Rob Pike - The Practice of Programming
- Donald Knuth - The Art of Computer Programming
- Ellen Ullman - Close to the Machine
- Ellis Horowitz - Fundamentals of Computer Algorithms
- Eric Raymond - The Art of Unix Programming
- Gerald M. Weinberg - The Psychology of Computer Programming
- James Gosling - The Java Programming Language
- Joel Spolsky - The Best Software Writing I
- Keith Curtis - After the Software Wars
- Richard M. Stallman - Free Software, Free Society
- Richard P. Gabriel - Patterns of Software
- Richard P. Gabriel - Innovation Happens Elsewhere
- Code Complete (2nd edition) by Steve McConnell
- The Pragmatic Programmer
- Structure and Interpretation of Computer Programs
- The C Programming Language by Kernighan and Ritchie
- Introduction to Algorithms by Cormen, Leiserson, Rivest & Stein
- Design Patterns by the Gang of Four
- Refactoring: Improving the Design of Existing Code
- The Mythical Man Month
- The Art of Computer Programming by Donald Knuth
- Compilers: Principles, Techniques and Tools by Alfred V. Aho, Ravi Sethi and Jeffrey D. Ullman
- Gödel, Escher, Bach by Douglas Hofstadter
- Clean Code: A Handbook of Agile Software Craftsmanship by Robert C. Martin
- Effective C++
- More Effective C++
- CODE by Charles Petzold
- Programming Pearls by Jon Bentley
- Working Effectively with Legacy Code by Michael C. Feathers
- Peopleware by Demarco and Lister
- Coders at Work by Peter Seibel
- Surely You're Joking, Mr. Feynman!
- Effective Java 2nd edition
- Patterns of Enterprise Application Architecture by Martin Fowler
- The Little Schemer
- The Seasoned Schemer
- Why's (Poignant) Guide to Ruby
- The Inmates Are Running The Asylum: Why High Tech Products Drive Us Crazy and How to Restore the Sanity
- The Art of Unix Programming
- Test-Driven Development: By Example by Kent Beck
- Practices of an Agile Developer
- Don't Make Me Think
- Agile Software Development, Principles, Patterns, and Practices by Robert C. Martin
- Domain Driven Designs by Eric Evans
- The Design of Everyday Things by Donald Norman
- Modern C++ Design by Andrei Alexandrescu
- Best Software Writing I by Joel Spolsky
- The Practice of Programming by Kernighan and Pike
- Pragmatic Thinking and Learning: Refactor Your Wetware by Andy Hunt
- Software Estimation: Demystifying the Black Art by Steve McConnel
- The Passionate Programmer (My Job Went To India) by Chad Fowler
- Hackers: Heroes of the Computer Revolution
- Algorithms + Data Structures = Programs
- Writing Solid Code
- JavaScript - The Good Parts
- Getting Real by 37 Signals
- Foundations of Programming by Karl Seguin
- Computer Graphics: Principles and Practice in C (2nd Edition)
- Thinking in Java by Bruce Eckel
- The Elements of Computing Systems
- Refactoring to Patterns by Joshua Kerievsky
- Modern Operating Systems by Andrew S. Tanenbaum
- The Annotated Turing
- Things That Make Us Smart by Donald Norman
- The Timeless Way of Building by Christopher Alexander
- The Deadline: A Novel About Project Management by Tom DeMarco
- The C++ Programming Language (3rd edition) by Stroustrup
- Patterns of Enterprise Application Architecture
- Computer Systems - A Programmer's Perspective
- Agile Principles, Patterns, and Practices in C# by Robert C. Martin
- Growing Object-Oriented Software, Guided by Tests
- Framework Design Guidelines by Brad Abrams
- Object Thinking by Dr. David West
- Advanced Programming in the UNIX Environment by W. Richard Stevens
- Hackers and Painters: Big Ideas from the Computer Age
- The Soul of a New Machine by Tracy Kidder
- CLR via C# by Jeffrey Richter
- The Timeless Way of Building by Christopher Alexander
- Design Patterns in C# by Steve Metsker
- Alice in Wonderland by Lewis Carol
- Zen and the Art of Motorcycle Maintenance by Robert M. Pirsig
- About Face - The Essentials of Interaction Design
- Here Comes Everybody: The Power of Organizing Without Organizations by Clay Shirky
- The Tao of Programming
- Computational Beauty of Nature
- Writing Solid Code by Steve Maguire
- Philip and Alex's Guide to Web Publishing
- Object-Oriented Analysis and Design with Applications by Grady Booch
- Effective Java by Joshua Bloch
- Computability by N. J. Cutland
- Masterminds of Programming
- The Tao Te Ching
- The Productive Programmer
- The Art of Deception by Kevin Mitnick
- The Career Programmer: Guerilla Tactics for an Imperfect World by Christopher Duncan
- Paradigms of Artificial Intelligence Programming: Case studies in Common Lisp
- Masters of Doom
- Pragmatic Unit Testing in C# with NUnit by Andy Hunt and Dave Thomas with Matt Hargett
- How To Solve It by George Polya
- The Alchemist by Paulo Coelho
- Smalltalk-80: The Language and its Implementation
- Writing Secure Code (2nd Edition) by Michael Howard
- Introduction to Functional Programming by Philip Wadler and Richard Bird
- No Bugs! by David Thielen
- Rework by Jason Freid and DHH
- JUnit in Action
#BlackOwned #BlackEntrepreneurs #BlackBuniness #AWSCertified #AWSCloudPractitioner #AWSCertification #AWSCLFC02 #CloudComputing #AWSStudyGuide #AWSTraining #AWSCareer #AWSExamPrep #AWSCommunity #AWSEducation #AWSBasics #AWSCertified #AWSMachineLearning #AWSCertification #AWSSpecialty #MachineLearning #AWSStudyGuide #CloudComputing #DataScience #AWSCertified #AWSSolutionsArchitect #AWSArchitectAssociate #AWSCertification #AWSStudyGuide #CloudComputing #AWSArchitecture #AWSTraining #AWSCareer #AWSExamPrep #AWSCommunity #AWSEducation #AzureFundamentals #AZ900 #MicrosoftAzure #ITCertification #CertificationPrep #StudyMaterials #TechLearning #MicrosoftCertified #AzureCertification #TechBooks
Top 1000 Canada Quiz and trivia: CANADA CITIZENSHIP TEST- HISTORY - GEOGRAPHY - GOVERNMENT- CULTURE - PEOPLE - LANGUAGES - TRAVEL - WILDLIFE - HOCKEY - TOURISM - SCENERIES - ARTS - DATA VISUALIZATION

Top 1000 Africa Quiz and trivia: HISTORY - GEOGRAPHY - WILDLIFE - CULTURE - PEOPLE - LANGUAGES - TRAVEL - TOURISM - SCENERIES - ARTS - DATA VISUALIZATION

Exploring the Pros and Cons of Visiting All Provinces and Territories in Canada.


Exploring the Advantages and Disadvantages of Visiting All 50 States in the USA

Health Health, a science-based community to discuss health news and the coronavirus (COVID-19) pandemic
- US infant mortality increased in 2022 for the first time in decades, CDC report showsby /u/cnn on July 25, 2024 at 6:37 pm
submitted by /u/cnn [link] [comments]
- Study raises hopes that shingles vaccine may delay onset of dementia | Dementia | The Guardianby /u/chilladipa on July 25, 2024 at 3:38 pm
submitted by /u/chilladipa [link] [comments]
- How fit is your city? New rankings by the American College of Sports Medicineby /u/idc2011 on July 25, 2024 at 3:35 pm
submitted by /u/idc2011 [link] [comments]
- Twice-Yearly Lenacapavir or Daily F/TAF for HIV Prevention in Cisgender Women | New England Journal of Medicineby /u/chilladipa on July 25, 2024 at 3:30 pm
submitted by /u/chilladipa [link] [comments]
- Biden Made a Healthy Decisionby /u/theatlantic on July 25, 2024 at 3:15 pm
submitted by /u/theatlantic [link] [comments]
Today I Learned (TIL) You learn something new every day; what did you learn today? Submit interesting and specific facts about something that you just found out here.
- TIL actor John Larroquette was the uncredited narrator of the prologue to the 1974 horror movie Texas Chainsaw Massacre. In lieu of cash, he was paid by the Director Tobe Hooper in Marijuana.by /u/openletter8 on July 25, 2024 at 6:56 pm
submitted by /u/openletter8 [link] [comments]
- TIL that the every Shakopee Mdewakanton Sioux indian receives a payout of around $1 million per year from casino profits.by /u/friendlystranger4u on July 25, 2024 at 6:22 pm
submitted by /u/friendlystranger4u [link] [comments]
- TIL Motorcycles in China are dictated by law to be decommissioned and destroyed in 13 years after registration regardless of the conditionsby /u/Easy_Piece_592 on July 25, 2024 at 5:56 pm
submitted by /u/Easy_Piece_592 [link] [comments]
- TIL a man named Jonathan Riches has filed more than 2,600 lawsuits since 2006. He even sued Guinness World Records to try to stop them from titling him as "the most litigious man in history".by /u/doopityWoop22 on July 25, 2024 at 5:03 pm
submitted by /u/doopityWoop22 [link] [comments]
- TIL that in 2018, an American half-pipe skier qualified for the Olympics despite minimal experience. Olympic requirements stated that an athlete needed to place in the top 30 at multiple events. She simply sought out events with fewer than 30 participants, showed up, and skied down without falling.by /u/ctdca on July 25, 2024 at 4:28 pm
submitted by /u/ctdca [link] [comments]
Reddit Science This community is a place to share and discuss new scientific research. Read about the latest advances in astronomy, biology, medicine, physics, social science, and more. Find and submit new publications and popular science coverage of current research.
- Abstinence-only sex education linked to higher pornography use among women | This finding adds to the ongoing conversation about the effectiveness and impacts of different sexuality education approaches.by /u/chrisdh79 on July 25, 2024 at 6:49 pm
submitted by /u/chrisdh79 [link] [comments]
- AlphaProof and AlphaGeometry 2 AI models achieve silver medal standard in solving International Mathematical Olympiad problemsby /u/Big_Profit9076 on July 25, 2024 at 5:59 pm
submitted by /u/Big_Profit9076 [link] [comments]
- Scientists have described a new species of chordate, Nuucichthys rhynchocephalus, the first soft-bodied vertebrate from the Drumian Marjum Formation of the American Great Basin.by /u/grimisgreedy on July 25, 2024 at 5:55 pm
submitted by /u/grimisgreedy [link] [comments]
- Secularists revealed as a unique political force in America, with an intriguing divergence from liberals. Unlike nonreligiosity, which denotes a lack of religious affiliation or belief, secularism involves an active identification with principles grounded in empirical evidence and rational thought.by /u/mvea on July 25, 2024 at 5:40 pm
submitted by /u/mvea [link] [comments]
- New shingles vaccine could reduce risk of dementia. The study found at least a 17% reduction in dementia diagnoses in the six years after the new recombinant shingles vaccination, equating to 164 or more additional days lived without dementia.by /u/Wagamaga on July 25, 2024 at 4:48 pm
submitted by /u/Wagamaga [link] [comments]
Reddit Sports Sports News and Highlights from the NFL, NBA, NHL, MLB, MLS, and leagues around the world.
- A's place their lone all-star, Mason Miller, on IL with fractured finger after hitting training tableby /u/Oldtimer_2 on July 25, 2024 at 8:15 pm
submitted by /u/Oldtimer_2 [link] [comments]
- Flyers sign All-Star Travis Konecny to an 8-year extension worth $70 millionby /u/Oldtimer_2 on July 25, 2024 at 7:45 pm
submitted by /u/Oldtimer_2 [link] [comments]
- Bills’ Von Miller says he believes domestic assault case to be closed, with no charges filedby /u/Oldtimer_2 on July 25, 2024 at 7:43 pm
submitted by /u/Oldtimer_2 [link] [comments]
- Padres' Dylan Cease throws no-hitter vs. Nationalsby /u/Oldtimer_2 on July 25, 2024 at 7:41 pm
submitted by /u/Oldtimer_2 [link] [comments]
- Appeal denied in Valieva case; U.S. skaters to get gold in Parisby /u/PrincessBananas85 on July 25, 2024 at 6:18 pm
submitted by /u/PrincessBananas85 [link] [comments]